Black boxes have been the enemy of QA testers since prehistoric times. When the first species of us, Homo Testerus, saw the first black box, they had the instinctive urge to attack and break it. But it did not go as they have expected. They tried to brute force it, and randomly attacked it, yet they got nothing but exhausting themselves.
Then, out of nowhere, they were given the knowledge of 5 methods to approach to that black box. This tutorial will give us the same knowledge to fully understand how to write test cases.

What the heck are you talking about?
Right, we didn’t talk about that enigmatic black box yet. Well, actually it is not that mysterious. “Black box testing” refers to testing the software without seeing the source code. That type of testing is a must to do and even when we say testing, most of the time we refer to black box testing.
We also have “White box testing”, and oh yeah! You got it! It is testing the inner mechanics of the program a.k.a. the code. It makes sense though eh? The box is the application, and the outside of it is black and the inside of it is white.
That’s not it, we have the yellow box, green box, red box, and blue box testing and we are not even kidding this time. We will be visiting all of them when the time comes, but for now, we will be discovering the main techniques that are used to write the test cases to perform black box testing.
Do you remember the “exhaustive testing” from the test cases tutorial and that we said that there are methods that we can prevent it? With the below two techniques, we will finally learn about them.
Lil note: We will be giving detailed practical examples about each method, and we will use an imaginary, RPG-style multiplayer video game as the sample scenario.
Equivalence Partitioning
Since we cannot write test cases for each and every possibility, we analyze the possible input values and divide them into several categories, called “partitions”, and accept all the values of the set “equal”. Ta-da, equivalence partitioning.
But what do we mean by accepting all of them equally? It means that if we test only one value (or the edge values, we will soon see in the next method) from the chosen partition, we assume that all the values in that category will have the same pass or fail status. Let’s illustrate this with an example.
For our game, as soon as the new players start the game, they are prompted to enter a username. Like in nearly any kind of application, there are length constraints on the username:
- Including the spaces, it cannot be less than 3 characters as per the producer’s requirements.
- And it cannot be more than 16 characters due to the UI design specifications.
If we were to perform exhaustive testing, we would have to test usernames with the character count of 1,2,3,4,5,6,7,8,9,10,11,12,13,14,15,16 and till forever. Well good luck writing test cases forever and beyond, we will do some partition testing.
Since we know that anything beyond the 3-16 interval would be unacceptable, we can make the divisions something like that:
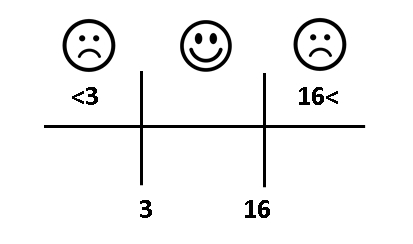
According to those partitions, we will only need to write 3 test cases.
| ID | Reproduction Steps | Expected Result |
| UserName_01 | 1. Launch the game with a fresh account. 2. Enter a name with 2 characters (e.g., EG). 3. Click on the ‘Confirm’ button. | An error popup displayed saying “Please enter a username between 3-17 characters” |
| UserName_02 | 1. Launch the game with a fresh account. 2. Enter a name with 3 characters (e.g., EGG). 3. Click on the ‘Confirm’ button. | Account is created and the game proceeds to the tutorial |
| UserName_03 | 1. Launch the game with a fresh account. 2. Enter a name with 17 characters (e.g., ILOVESCRAMBLEDEGG). 3. Click on the ‘Confirm’ button. | An error popup displayed saying “Please enter a username between 3-17 characters” |
This method is usually combined with boundary value testing, so that we may need to write the cases for 2, 3, 4, 15, 16, and 17 characters.
Boundary Value Analysis
Instead of writing test cases for each and every possibility, we analyze the scenario and design the test cases only for the edges. To make it clearer, if we call the lower end ‘L’ and the higher end ‘H’ the following cases should be tested: L-1 (L minus 1), L, L+1, H-1, H, H+1.
For those who wholeheartedly hate math and cannot stand even the simplest formulas, the cases look like:
- Right below the low end
- Low end
- Right above the low end
- Right below the high end
- High end
- Right above the high end
And for those, who do not care about abstract concepts and merely want to see real-life examples, you come closer. No, we won’t perform a decimation. There is just a nice example waiting for you here.
Lil info for whom are not familiar with online games: To allow more people to play the game, online games usually have multiple servers to play in to allow more players, and each server will have limits to be active and on the users that can connect to.
In our example,
- Each server will allow 100 players at the same time
- And if there are less than 2 players for 5 minutes, it will be inactive
The boundaries are 2 and 100, so we need to test the server activity with 1, 2, 3, 99, 100, and 101 players. Let’s write the examples for 2 of them.
| ID | Reproduction Steps | Expected Result |
| ServerActivity_01 | 1. Launch the game and enter your credentials. 2. Enter the test server. 3. Using the GM menu, set the server’s time to 5:00 minutes. 4. Observe the situation. | Player gets redirected to the server selection menu with the message popup saying “Test server is deactivated as there are not enough players” |
| ServerActivity_02 | 1. Launch the game and enter your credentials. 2. Using the GM menu, add 100 players to the test server. 3. Attempt to enter the test server 4. Observe the situation. | An error message pops up with the message saying, “This server is full”. |
State Transition Testing
Before we learn about this fancy method, let’s see the hands, how many people know what state means in computing? Nobody? Alright, let us explain that first.
A state is the condition of the program depending on the stored user inputs. Just like the state of the matter (gas, liquid, solid. Based on the input of temperature) that we learned in middle school a dynamic application, or the object of the application can be in multiple different states.
For example, as the most cliche example, a user who tries to log in to the website can be in the “not logged in”, “attempting to log in”, “logged in” and “blocked”. And the updating action between the states is called “transitions”, so the point of this method is to validate these transitions.
Before performing it, we usually analyze the states and the transitions by drawing a “state flow diagram”. Then, we create the test cases for each of the states. Like all the other techniques we covered, we will practically go through it using a sample game mechanic.
Indeed, state transitioning is a very relevant technic to use in game design. For instance, if you ever mess around with the game engines, you might have had to create a state diagram for the animations or the movement pattern of the objects.
In this example, we will implement the very basic movement mechanics of a character based on the player’s input (in this case the keys they hit on the keyboard). The specifications are:
- W – A – S – D: As long as pressed, the character will be heading in north, west, south, and east directions respectively. When released, she will stop.
- When the following key combinations are pressed, the character will move to the intermediary directions of northeast, northwest, southwest, and southeast: W+D, W+A, A+S, and S+D.
- If in one of the combinations, a key is released, the character will keep moving to the corresponding main direction of the remaining key. (e.g., While heading to the northeast with W+D, D is released, the character should start heading to the north instead.)
- Other than the given conditions, any other combination will be ignored.
So, from the requirements, the character moving states will be idle (not moving), heading to north, east, south, west, northeast, northwest, southwest, and southeast.
And the transitions will be done by pressing or releasing W, A, S, D, or the combinations of WD, WA, AS and SD. Now, we can create the state transition diagram.
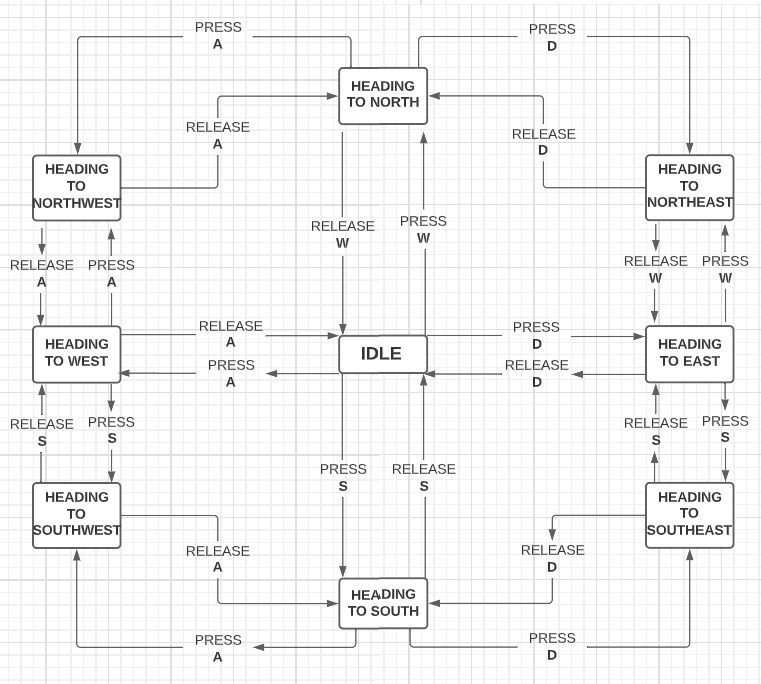
As you can see, it’s also simple in the theory, but might take a good time to draw when the design gets more complex, like in 3D animations.
Transitions are represented by the arrows, so we need to test each of those scenarios to see if they move us to the intended state. In total there are 24 of them, yet the number of the cases may go down depending on the structure of the test cases.
To illustrate, we can write a different case for each transition, or we can combine 2 or more transitions in a single case, like one unit for both press and release for a state. We will create a couple of test cases using this method for reference as well. Oh, it’s already there. Scroll down!
| ID | Reproduction Steps | Expected Result |
| CharacterMove_01 | 1. Start the game with any character. 2. Press and hold on to the key ‘W’. 3. Observe the character’s moving direction. 4. Release ‘W’ and observe the character. | While ‘W’ is being pressed, the character should keep heading to the north, and when released, it should turn back to idle. |
| CharacterMove_02 | 1. Start the game with any character. 2. Press and hold on to the key ‘W’ and ‘D’. 3. Observe the character’s moving direction. 4. Release ‘W’ and observe the character’s moving direction. | While ‘W’ and ‘D’ are being pressed, the character should keep heading to the northeast, and when ‘W’ is released, it should start heading to the east. |
Okay, I know. It might seem a bit frustrating to write these for every single situation, but in fact, after creating a couple of them, it gets tremendously faster to create the rest as nearly all of the cases will look similar with the same structure.
Decision Tables
A decision or cause/effect table is a matrix created to determine the test cases (in other words, the rules) for functionality by calculating every result (output) through the combinations of all the possible inputs. Fancy definition ha? You’re confused ha? Hahaha. Then, let’s reduce the confusion back to 0 by creating a decision table together.
For the game, we now need to test the overall damage stat for the prototype character, called Apollone, with 3 different ways to manipulate her overall damage:
- If there is an ally support character around, the damage will increase by 10% of the base damage.
- When the character’s “fury” skill is active, the damage will increase by 20% of the base damage.
- If the character is in the enemy zone, the damage will decrease by 15% of the base damage.
Now, let’s take a look at what are all the outputs possible with the combination of these inputs/specifications.
We first need to determine how many rules will be there in the end. The good news is we can know that from the very beginning as we already have the information on the conditions. Here’s the formula that you haven’t been looking for (Keep in mind that a condition can be either true or false):
2Number of Conditions = Number of Rules = Number of Test Cases
In our case, we have 3 different conditions, so that 23=8 is the number of units we will have to test. Decision matrixes are structured with the crossover of the conditions and the rules, so we write the rules to the first column, and the rules to the first row (It can be vice versa, but we like this to look better).
| Conditions/Rules | I | II | III | IV | V | VI | VII | VIII |
| Support Around (+10%) | ||||||||
| Fury Active (+20%) | ||||||||
| In Enemy Zone (-15%) | ||||||||
| Overall damage change |
Now, we can fill out the table. Remember that we said each condition can be either true or false. To make each combination unique, we follow the pattern:
- 1st condition/row: T – T – T – T – F – F – F – F
- 2nd condition/row: T – T – F – F – T – T – F – F
- 3rd condition/row: T – F – T – F – T – F – T – F
In the end, after filling and making the calculations, we have our finalized decision matrix.
| Conditions/Rules | I | II | III | IV | V | VI | VII | VIII |
| Support Around (+10%) | ✔️ | ✔️ | ✔️ | ✔️ | ❌ | ❌ | ❌ | ❌ |
| Fury Active (+20%) | ✔️ | ✔️ | ❌ | ❌ | ✔️ | ✔️ | ❌ | ❌ |
| In Enemy Zone (-15%) | ✔️ | ❌ | ✔️ | ❌ | ✔️ | ❌ | ✔️ | ❌ |
| Overall damage change | +15% | +30% | -5% | +10% | +5% | +20% | -15% | 0% |
So, now as we have the table in hand, we can ultimately create our test cases. It is pretty easy to manually create a table when there are 2-4 conditions, but if the rules might get more complex with more than 5 inputs, it is better to use an automation tool like Weka for us to make the tables.
We will create mini-humblified test cases for the first two rules. We will leave the rest of them for you to practice (Or homework?).
| ID | Reproduction Steps | Expected Result |
| PrototypeAD_01 | 1. Start the game with Apollone. 2. Spawn a support character bot. 3. Activate the Fury skill. 4. Teleport to the enemy zone. 5. Open the stats table. 6. Observe the current damage. | Current overall damage increased to 115. |
| PrototypeAD_02 | 1. Start the game with Apollone. 2. Spawn a support character bot. 3. Activate the Fury skill. 4. Open the stats table. 5. Observe the current damage. | Current overall damage increased to 135. |
See? Easy, peasy, lemon squeezy. Overall, we are doing nothing but determining the business rules. So that it indeed is not specific to QA, and it can be used for various purposes like data analysis or business programming.
Error Guessing
Our last technic is a bit special as it differs from the others with its wild, unstructured approach. This technic is not something that every tester can do. It takes guts, commitment, bravery, and chivalry (Ok, I’ll stop).
It is indeed more of an experience-based way to create test cases. If a QA analyst has tested similar kinds of applications long enough, they will have an intuition about the possible defects as they have seen those issues over and over again.
In addition to the experienced ones, peeps who have the thinking-out-of-the-box (Or out-of-the-black-box, amirite?) ability would be talented in designing test units using this method. What if a tester is both experienced, and can also think creatively? That, my friends, can finally start their own blog to spread wisdom to other people.
There is no structure for this method, so it may be a bit unclear to see how it is done. So, we will try to clean the air a bit with the following example.
There is a new, campaign mode is added to the game, and we are ought to test it. One of the requirements says when the user attempts to exit the game without saving the progress, there should be a popup asking if the user wants to save the game, and there should not be any instance where the progress is not saved without the user’s permission.
So, we write our test cases for the situation when the user tries to return back to the main menu, and when they try to shut down the game.
But what if the annoying brother of the player decides to pull a prank and close the game using ALT+F4? Or their angry mom plugs the computer off right before taking the last hit on the final boss? There was no popup, all the hard work of the player is gone, and the player is now the brother, and the mom are the victim of the domestic violence.
Dude don’t laugh! Effects of the video games should not be taken lightly. Me? No, I just remembered a funny joke my boss made the other day (Okay you got me, this freakout is hilarious, zuhahaha).
Let’s rewind the time a bit. We are experienced enough to play games and know that the game will not always be closed to the player’s will and there might be outer factors like those. To prevent all the ugly scenarios, we test the cases where the game shuts down unexpectedly.
| ID | Reproduction Steps | Expected Result |
| CampaignSD_05 | 1. Launch the game. 2. Enter the campaign mode. 3. Pass the level 1 via debug. 4. Plug the computer out. 5. Plug in and relaunch the game. 6. Enter the campaign mode. 7. Observe the level. | Progress is auto saved, and the player is in level 2. |
Now we can go back to battle the black box again and end the test cases story.

We wrote a test plan, did requirement mapping, examined the test cases in their habitat, took a close look at their genotype and phenotype, created some, imprisoned them into RTMs, executed them, and fought with the black boxes using them.
But there is an inevitable side effect of executing the test cases. Bugs… bugs are coming. Time to learn how to deal with the defects.
